Stupid Godot tricks
February 19, 2021
Once I got Bakalist to a point where I was happy with it I wanted to make something with Godot. I’ve always wanted to make a Gradius style shooter so I figured I’d mix that with the physics of Flappy Bird for a fun and quick project.
Sputtery Spaceship can be played at itch.io and if you’re interested you can take a peek at the source code.
This was my second time experimenting with Godot and I’m starting to feel more comfortable with it. Since I’m still learning (as always) I felt like there were a few small things that I picked up while working on this that could be helpful to others.
Enabling collision detection for RigidBody2D objects
Godot has three different types of body objects that can be used to simulate movement and physics: Area2D, StaticBody2D, RigidBody2D, and KinematicBody2D. The Godot docs’ physics introduction does a great job of breaking down the differences between the four different types.
As I wanted to make a physics heavy game similar to Flappy Bird it was important that almost all objects on the screen had their own 2D physics, so almost everything in Sputtery Spaceship is a RigidBody2D.
Godot provides signals to make communication between different scenes and components easier. They’re based off of the observer pattern and pretty much function as event listeners.
RigidBody2Ds have a body_entered signal that is helpful to detect when two bodies collide. However, it turns out this signal is not emitted by default. This caused me to try and establish an Area2D inside of the RigidBody2D node - this was a really buggy and cumbersome way to deal with collision detection.
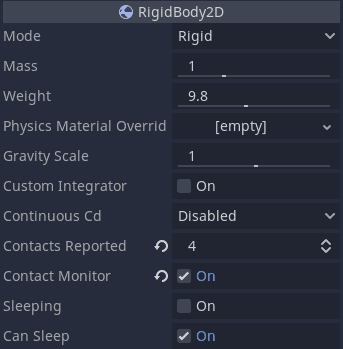
Turns out that body_entered can be enabled simply by using the node inspector to enable Contact Monitor and setting Contacts Reported to greater than 0. Once these changes are made then the body_entered and body_exited signals can be reliably bound to a function and collision detection is simple.
Enabling Contact Monitor and setting Contacts Reported to greater than 0 enables collision detection for RigidBody2D nodes
This is all mentioned in the Godot documentation, but it took me a while to actually look in the right place. I assume the contact monitor is disabled by default for performance reasons.
Groups are helpful for managing game state
Groups provide an easy way to see which nodes belong to the current game and which are more permanent.
This is what happens when a node that is only for the current game is added (ex. an enemy, bullet, or asteroid):
var new_enemy = Enemy.instance()
add_child(new_enemy)
new_enemy.add_to_group("instance")
Every node that is only relevant to the current game is added to the instance group. Once the game over screen state is hit the following function is run:
func cleanup_previous_game():
	for child in get_children():
		if child.is_in_group("instance"):
			child.queue_free()
This cleans up all of the nodes that were only relevant to the game that just ended. Groups can make state management easy.
Looping as I did above is probably not the most efficient way to clean up the state (there are tools in Godot to retrieve all children based on the instance name), but it works for this game.
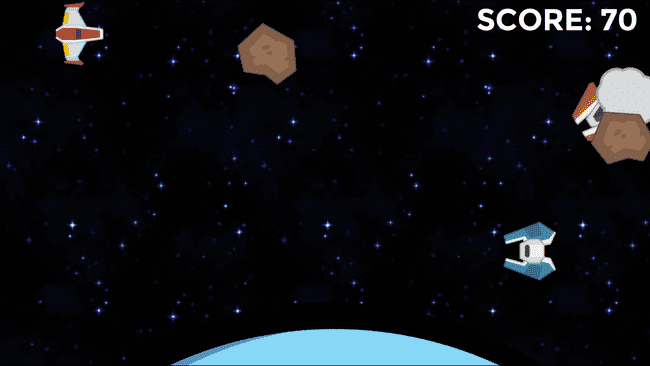
Almost every sprite in this picture belongs to the “instance” group, which is cleared after every game.
Use scenes as much as possible
When I started everything was a child node of the main scene. This meant that in order for a new player to be instanced, they needed to make use of a player node that was hidden somewhere off the screen. Same for every other body node - and this immediately caused several problems as the original nodes would occasionally be removed.
I only did this as a temporary hack so that I could get a start on things. This was a mistake and cleaning it up ended up taking more of my time than it should have.
A more elegant solution involved making almost everything into its own scene (except for the rotating planet, since its logic is very simple and it never goes anywhere). The player class is its own scene, each enemy type is its own scene, and even bullets are their own scene.
Making use of scenes in this way allows for easy instancing of new nodes without worrying about the original node disappearing in one way or another.
In order to make use of a node that you’ve broken into its own scene you need to preload the scene in the main game scene:
var Player = preload("res://Scenes/Player.tscn")
var Enemy = preload("res://Scenes/Enemy.tscn")
var SmarterEnemy = preload("res://Scenes/SmarterEnemy.tscn")
Adding a new instance of a preloaded scene is simple - here’s an example of how a new player is added when a new game is started:
player = Player.instance()
add_child(player)
player.connect("player_shoot_bullet", self, "_on_player_shoot_bullet")
Although it’s easy to hear the word “scene” and assume they’re just intended for different game screens, they’re actually incredibly handy as a means to componentize the different nodes that the game needs to dynamically create.
That’s a wrap
All in all, Godot made this into a fun yet quick project. I’m looking forward to diving into the world of 3D game development next, as that’s something I’ve always wanted to try but haven’t got around to.
Hopefully some of this article was useful - I’m finding that my comfort level with Godot changes daily so it’s likely that some of my suggestions might not be the best way to do things in the framework. Please let me know if there is a way I can improve any of the suggestions I’ve made.
If you didn’t play the game earlier in the article then give it a try!


